
Are your active learning teaching methods starting to feel a bit repetitive? Are you looking for new ways to liven up your classroom? Do you feel challenged by a lack of resources, or uncertain how to use what you do have?
Using your existing technology, and some free software on the internet, you can create an escape room activity that will wow your students (and your department chair).
Creating an escape room activity sounds intimidating, but it’s easier than you think. Here, I will show you how to build an escape room activity using PowerPoint and Google Forms and share an example I created.
I have also included a link to our resources page below, where you can download a PowerPoint template to design your own!
Create your Escape Room Activity in 5 Steps
Step 1: The Scenario

First, you need to create a scenario. A good escape room activity is based on a good scenario. At the start, the students should encounter a story that establishes a reason they must escape the room. Scenarios set in hospitals or clinics, research labs, or locations in the community may be appropriate for your topic.
For example, in a clinical setting, the students may need to see patients in multiple exam rooms. In my example, the students will need to review the patient’s file, interview the patient and a family member, and answer a question from the attending to leave the room.
Step 2: The Questions

Decide what concepts you want to assess or reinforce. To ensure the students take it seriously, they must be challenging and relevant (an escape room is silly enough!)
In my example, I chose to use board-style multiple choice questions, but you can use any question type, as long they have a single discreet answer that can be shortened somehow (more about this later).
Questions don’t have to be overly complicated, just appropriate for the student at their level of education. Don’t include too many questions, or the activity may get overly long and monotonous. In my example, I included four MCQs and gave the students 15 minutes to answer in small groups.
Step 3: The Lock

Remember the short answers I mentioned? These answers will be used to create the code to exit the room. The code can consist of the letters associated with the correct answer choices (A, B, C, D, E), a combination of the first letters of fill in the blank answers, or anything else you can dream up.
Google forms is an easy-to-use option that is completely free!
To create a Google form, go to forms.google.com and click the “+” to start a new form. Give your form a title. For example, “Escape the Hospital Room”. Next, add a question by clicking the “+” sign in the ribbon next to your title. Select “Short answer” from the pull-down menu. In the “Question” box, enter a statement such as: “Enter the code to leave the room”. Type in your code in the “Short answer text” field.
In the lower right corner of the question, select “Required”, and click the three dots. A menu will pop up. Select “Response validation”. This will ensure the students need to enter the code exactly to proceed. If you code is a number, select “Number” and “Equal to”, then enter the number in the field. If your code is a series of letters, select “Text” and “Contains”, then enter your code in the text field. In the “Custom error text” field, you can enter a statement that shows up when the wrong code is entered, like “Try all caps” or “Return to the room and try again”.
Next, go back to the ribbon and select the last choice with two rectangles to add a new section. This new section will be the page that appears when the correct code is entered. Make sure that the text above the new section states “After section 1; Continue to next section”.
In section 2, enter a title and description. For example, “Congratulations!” and “You escaped the room!” Well done, you have created your lock! Optionally, you can customize the appearance under “Customize theme” which looks like a paint pallet in the upper right corner of the page. Another option is to make it a graded quiz by using the options under “Settings”.
Step 4: The Room
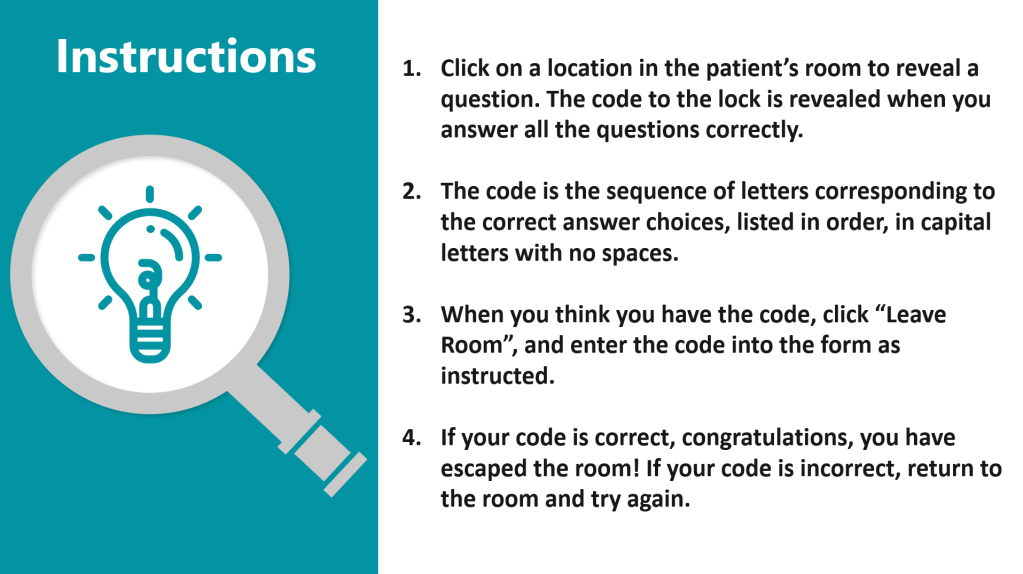
Create your room using PowerPoint. In the first few slides, include your scenario and instructions for the activity. Make sure your instructions clearly state how to use the correct answers to come up with the lock code. Students may get frustrated if they know the correct answers but cannot open the lock because they don’t know how to create the code from them.
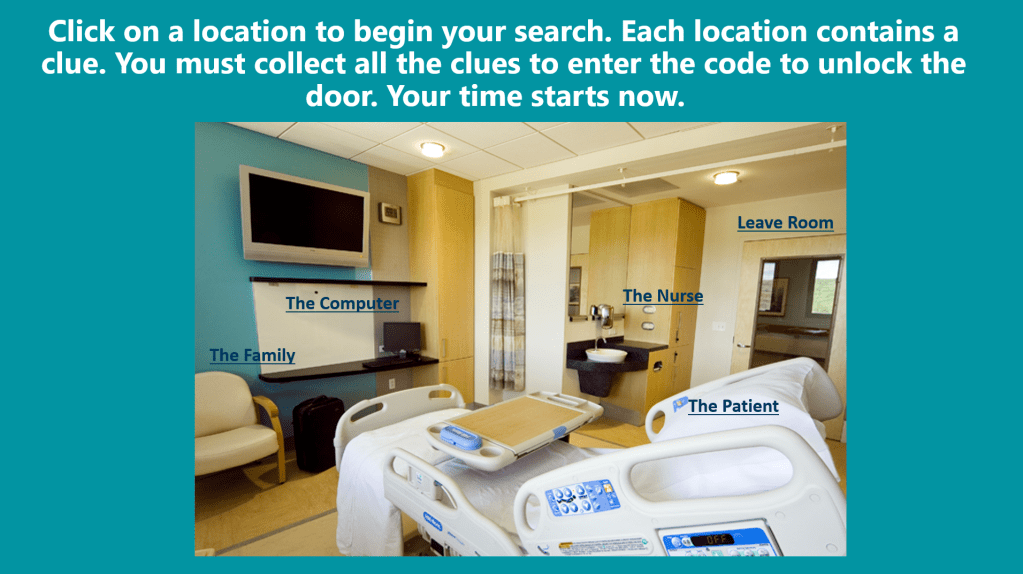
After the scenario and instructions, add your room. Use a stock image, or one you find on the internet, that shows the site in which the scenario takes place, like a waiting room, clinic hallway, or research laboratory. In my example, I used a hospital room. You will use this slide as your escape room by adding links to the individual questions and the Google form. Include a sentence or two that instructs the students to click the links to access the questions and leave the room. We will add those in a moment.
Add your questions, individually, to the subsequent slides. On each question slide, insert a text box in the lower right-hand corner and enter “Back to Room”. Then, highlight this text, right click, and select “Link”. A window will pop up. On the left-hand side, select “Place in This Document”. From the menu, select the slide with the image of your room. Repeat for every question.
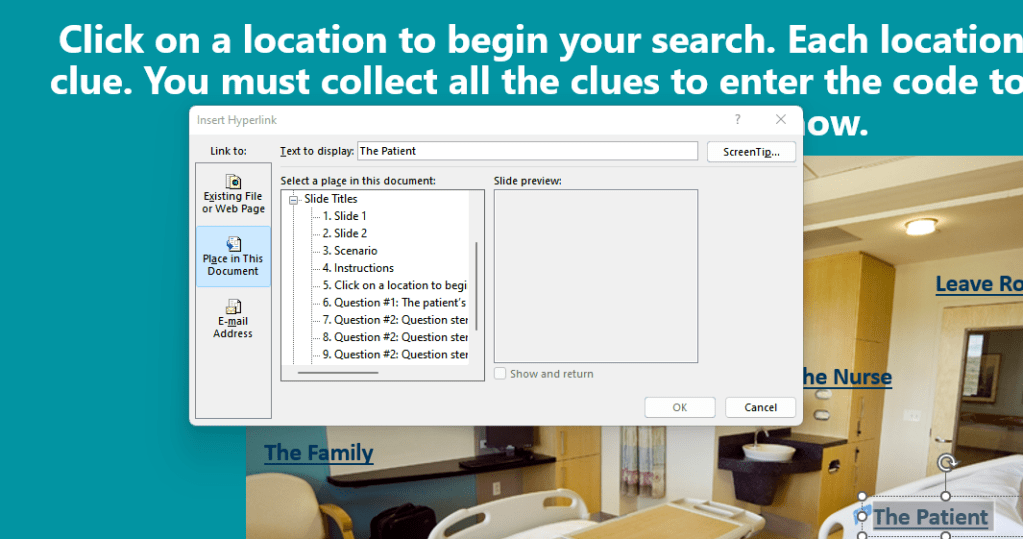
Go back to your escape room image slide. Insert text boxes over the image, one for each question you have and one that says, “Leave Room”. For each question, enter text to serve as a title. You can go simple and enter a question number, or you can make the scenario more realistic by entering the names or descriptions of individuals. In my example, I entered descriptions of people and items in the room.
Once you have inserted all your text boxes, repeat the process above to link to the slides that contain the corresponding questions, and the Google form that contains the lock. To enter the link to the lock, go back to your Google form and select “Send” in the upper right-hand corner. Select the link icon in the pop up. Copy the link, return to your PowerPoint, and highlight the “Leave Room” text box. Select “Link”. This time, select “Existing File or Web Page” and paste the link into the “Address” field.
To create your own, download our custom Escape Room PowerPoint Template here!
Step 5: The Big Day!
On the day of your session, you can post the PowerPoint for your students to download and use in presentation mode on their computer. Alternatively, you can share the PowerPoint online by clicking “Share” in the upper-right corner of PowerPoint and copying the link to share. Using this link, the students can navigate the room in an interactive format online, but you must have Microsoft OneDrive to do so. Usually, if you have an Outlook email you also have access to OneDrive. If you prefer to share online and want to shorten the link, you can use a website like tinyurl.com to create a shorter, custom link.
Break the students up into small groups and give them a defined period to escape the room. In my example, I allotted 15 minutes to answer four questions, but you may add a few more and adjust the time as needed. For my students, 15 minutes was just the right amount of time for most groups to escape the room. After the time is up, debrief all the questions to ensure any groups that did not escape are aware of the correct answers and how to arrive at them.
Voila! You have created a fun and engaging escape room active learning experience your students are sure to enjoy.
You can download our PowerPoint template, found on our resources page, to get started. For more tips, tricks, and active learning activities, subscribe to our blog or follow us on LinkedIn.
